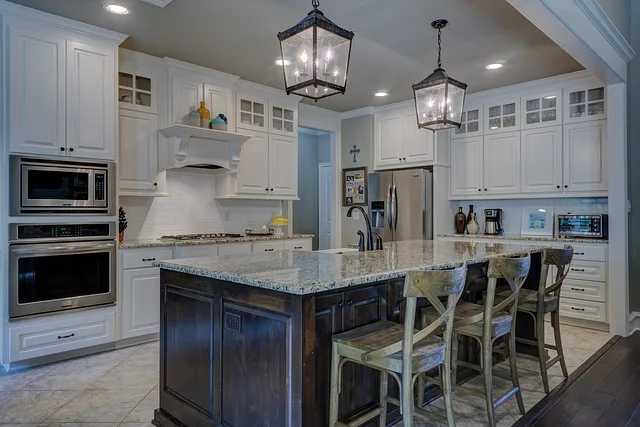
First things first, you’ll want to clear out your cabinets. Think of it as decluttering your mind before a big project. Once everything is out, give those cabinets a good clean. A mixture of warm water and mild soap works wonders. You want to remove any grease or grime that’s built up over time—trust me, your paint will thank you!
Next, it’s time to sand. Grab some fine-grit sandpaper and start smoothing out the surfaces. This step is crucial because it helps the new paint stick like glue. Imagine trying to paint on a slippery surface; it just won’t work! After sanding, wipe down the cabinets with a damp cloth to remove any dust.
Now, let’s talk paint. Choosing the right color can feel like picking an outfit for a first date—exciting but a bit daunting! Go for a high-quality, durable paint that can withstand the hustle and bustle of kitchen life. A semi-gloss or satin finish is often a great choice because it’s easy to clean and looks fabulous.
When you’re ready to paint, use a brush for the corners and a roller for the flat surfaces. This combo will give you that professional finish without the professional price. Apply at least two coats, allowing each coat to dry completely. It’s like building a cake; you want each layer to be perfect before adding the next!
Finally, once everything is dry, reattach the hardware, and step back to admire your handiwork. Your kitchen will feel fresh and inviting, and you’ll have the satisfaction of knowing you did it all yourself!
Transform Your Space: A Step-by-Step Guide to Refinishing Kitchen Cabinets
First things first, gather your supplies. You’ll need sandpaper, a good primer, paint or stain, and some brushes. Think of this as your toolkit for a mini kitchen revolution! Start by removing all the cabinet doors and hardware. It’s like giving your cabinets a little vacation while you work your magic.
Next, it’s time to sand those surfaces down. This step is crucial because it helps the new finish stick better. Picture it like prepping a canvas before painting a masterpiece. Once you’ve sanded everything, wipe away the dust with a damp cloth. You want a clean slate for your new look!
Now, apply a coat of primer. This is where the magic begins! Primer not only helps the paint adhere but also ensures that the color pops. After the primer dries, grab your paint or stain and get to work. Use smooth, even strokes, and don’t rush it. Think of it as a dance; you want to be graceful and deliberate.
Once everything is painted and dried, it’s time to reattach the doors and hardware. This is the moment of truth! Stand back and admire your handiwork. You’ve just transformed your kitchen into a fresh, inviting space. It’s like giving your home a new outfit without the hefty price tag. So, are you ready to roll up your sleeves and dive into this exciting project? Your dream kitchen is just a few steps away!
From Drab to Fab: The Ultimate DIY Guide to Painting Kitchen Cabinets
First things first, let’s talk about prep work. Think of it as the foundation of a house; if it’s shaky, everything else will crumble. Start by emptying your cabinets and giving them a good clean. You want to remove any grease or grime that’s built up over the years. Once they’re squeaky clean, it’s time to sand them down. This step is crucial because it helps the paint stick better. Imagine trying to paint a slippery surface—it just won’t work!
Now, onto the fun part: choosing your paint! Do you want a bold color that screams personality, or a soft hue that whispers elegance? The choice is yours! Just remember, a high-quality paint will make all the difference. It’s like choosing between a gourmet meal and fast food; one will leave you satisfied, while the other might just leave you wanting more.
Once you’ve picked your paint, grab a brush and start applying! Use long, even strokes to avoid those pesky brush marks. And don’t forget to let each coat dry completely before adding another. It’s like waiting for a cake to bake; patience is key!
Revitalize Your Kitchen: Expert Tips for Refinishing Cabinets Like a Pro

First off, let’s talk about prep work. Think of it as the foundation of a house; if it’s shaky, everything else will crumble. Start by removing all the cabinet doors and hardware. This step is crucial! It’s like giving your cabinets a fresh canvas to work with. Clean them thoroughly to remove grease and grime—nobody wants to paint over a sticky surface!
Next, sand those cabinets down. It might sound tedious, but it’s like exfoliating your skin before a big night out. You want that smooth finish! Use a medium-grit sandpaper to get rid of the old finish, then switch to a finer grit for a silky touch. Don’t forget to wipe away the dust afterward; it’s the little things that make a big difference.
Now, let’s talk color. Choosing the right paint can feel like picking an outfit for a first date—so many options! Go for a high-quality, durable paint that can withstand the hustle and bustle of kitchen life. A semi-gloss or satin finish is perfect for cabinets, as it’s easy to clean and adds a lovely sheen.
Finally, when it’s time to reattach those doors, consider updating the hardware too. New knobs or pulls can be the cherry on top of your kitchen sundae! With these expert tips, you’ll be well on your way to achieving a professional-looking cabinet refinishing that will have your friends asking for your secret.
Color Your World: Choosing the Perfect Paint for Your Kitchen Cabinets

First off, think about the vibe you want to create. Are you aiming for a cozy farmhouse feel or a sleek, modern look? Colors like soft whites and muted pastels can give you that warm, inviting atmosphere, while bold hues like navy or emerald green can add a touch of drama and sophistication. Imagine walking into your kitchen and feeling like you’ve stepped into a chic café or a serene retreat—now that’s the power of color!
Next, consider the finish. Do you want a glossy sheen that reflects light and makes your space feel larger? Or perhaps a matte finish that offers a more understated elegance? Glossy finishes are like the high heels of paint—they catch the eye and elevate the space, while matte finishes are the comfy sneakers, providing a laid-back charm.
Don’t forget about durability! Your kitchen cabinets face daily wear and tear, so opt for paints that are specifically designed for cabinetry. Look for options that are stain-resistant and easy to clean. It’s like choosing a reliable car; you want something that can handle the bumps in the road without losing its shine.
Frequently Asked Questions
Can I refinish cabinets without sanding?
Refinishing cabinets without sanding is possible by using a liquid deglosser or a bonding primer. These products help to prepare the surface for painting or staining without the need for traditional sanding. Ensure the cabinets are clean and free of grease before applying these products for the best results.
How long does the refinishing process take?
The duration of the refinishing process varies based on the type of surface and the extent of work required. Generally, it can take anywhere from a few days to a couple of weeks. Factors such as drying time, the number of coats applied, and the complexity of the project can influence the timeline.
What type of paint is best for kitchen cabinets?
For kitchen cabinets, a high-quality acrylic or latex paint is recommended due to its durability and ease of cleaning. Look for paints specifically designed for cabinetry, which often have a satin or semi-gloss finish to withstand moisture and stains while providing a smooth, attractive appearance.
How do I prepare cabinets for painting?
To prepare cabinets for painting, start by removing all hardware and doors. Clean surfaces thoroughly to eliminate grease and dirt. Sand the surfaces to create a smooth base and ensure better paint adhesion. Fill any holes or imperfections with wood filler, then sand again once dry. Finally, wipe down the cabinets with a damp cloth to remove dust before applying primer and paint.
What materials do I need to refinish kitchen cabinets?
To refinish kitchen cabinets, you will need sandpaper, a paint or stain of your choice, a primer, a paintbrush or roller, a clean cloth, and a sealant or topcoat for protection. Additionally, having a drop cloth, painter’s tape, and safety gear like gloves and a mask is recommended for a safe and effective process.