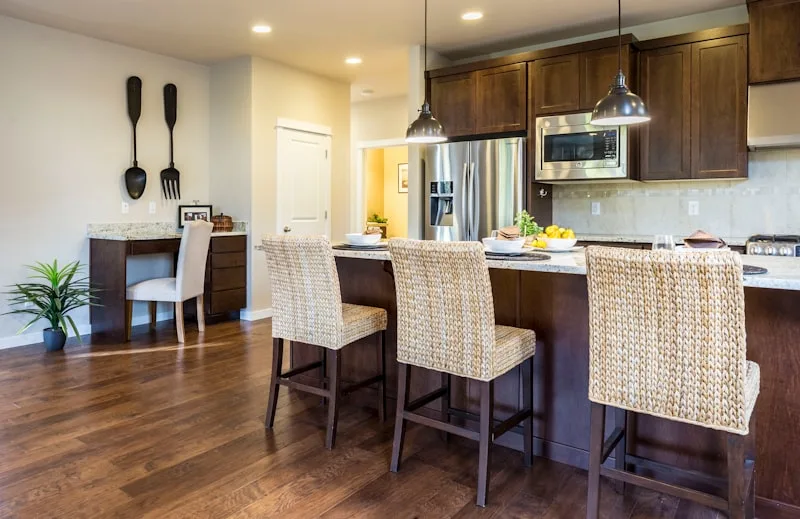
First things first, prep work is key. Just like a painter wouldn’t start without a clean canvas, you shouldn’t jump into staining without prepping your cabinets. Start by removing all the hardware—handles, knobs, and hinges. Then, give those cabinets a good scrub to remove grease and grime. Think of it as giving your cabinets a refreshing shower!
Once they’re clean, it’s time to sand. Grab some sandpaper and get to work! Sanding not only helps the stain adhere better but also smooths out any imperfections. It’s like giving your cabinets a mini facelift. After sanding, wipe them down with a damp cloth to remove any dust.
Now, let’s talk stain. Choose a high-quality wood stain in the shade you desire. Dark walnut or espresso can add that luxurious touch. Apply the stain with a brush or cloth, working in the direction of the wood grain. It’s like painting a masterpiece—take your time and enjoy the process!
After applying the stain, let it sit for a few minutes before wiping off the excess. This step is crucial; it’s where the magic happens! The longer you let it sit, the darker the finish will be. Just remember, patience is a virtue here.
Transform Your Kitchen: A Step-by-Step Guide to Darkening Your Cabinets
First things first, gather your supplies. You’ll need a good quality paint or stain, brushes, sandpaper, and some protective gear. Think of this as your kitchen makeover toolkit—like a superhero’s utility belt, but for DIY projects! Once you’ve got everything, it’s time to prep. Start by removing the cabinet doors and hardware. This is like giving your cabinets a fresh start, stripping away the old to make way for the new.
Next, give those surfaces a good sanding. This step is crucial! It’s like exfoliating your skin before applying moisturizer; it helps the paint or stain adhere better. After sanding, wipe down the cabinets to remove any dust. Now, you’re ready to apply your chosen color. Whether you opt for a deep navy, a rich charcoal, or a classic black, each stroke of the brush is like adding a layer of personality to your kitchen.
From Drab to Fab: Mastering the Art of Dark Staining Kitchen Cabinets
Imagine walking into your kitchen and being greeted by rich, deep hues that exude warmth and sophistication. Dark stains can do just that! They add depth and character, making your space feel inviting and stylish. Plus, they’re incredibly versatile. Whether you’re going for a rustic farmhouse vibe or sleek modern aesthetics, dark stains can adapt to your vision.
Now, you might be wondering, “How do I even start?” First things first, prep is key! Clean those cabinets thoroughly and sand them down to create a smooth surface. Think of it like giving your cabinets a fresh canvas to work with. Once you’ve prepped, it’s time to choose your stain. Dark walnut, espresso, or even a bold black can elevate your kitchen’s look dramatically.
When applying the stain, use a brush or cloth to ensure even coverage. It’s like painting a masterpiece—take your time and enjoy the process! And don’t forget to seal the deal with a protective topcoat. This not only enhances the color but also protects your cabinets from daily wear and tear.

So, are you ready to unleash your inner DIY artist? With a little effort and creativity, you can turn your kitchen into a space that reflects your style and personality. Dark staining kitchen cabinets isn’t just a trend; it’s a timeless way to breathe new life into your home.
The Ultimate DIY Guide: Achieving a Rich, Dark Finish on Your Kitchen Cabinets
First things first, prep work is key. Just like a painter needs a clean canvas, your cabinets need a good scrub. Remove all the hardware and give them a thorough cleaning. Think of it as giving your cabinets a spa day! Once they’re squeaky clean, it’s time to sand them down. This step is crucial because it helps the new finish adhere better. Grab some sandpaper and get to work—don’t rush it; this is where the magic begins.
Now, let’s talk about the finish. A rich, dark stain can transform your cabinets from drab to fab. Choose a stain that resonates with your style—walnut, espresso, or even a deep mahogany can work wonders. Apply the stain with a brush or cloth, and watch as the wood grain comes to life. It’s like giving your cabinets a new wardrobe!
After staining, don’t forget to seal the deal. A good topcoat will protect your hard work and give your cabinets that glossy, professional look. Think of it as the cherry on top of your sundae! Apply it evenly and let it dry completely.
Stain Secrets: Expert Tips for Darkening Your Kitchen Cabinets Like a Pro
First off, prep work is key. Think of it as the foundation of a house; without a solid base, everything crumbles. Start by removing all the cabinet doors and hardware. Give them a good clean to remove grease and grime—trust me, your stain will thank you later! Sanding is next on the list. It’s like giving your cabinets a fresh haircut; it helps the stain adhere better and gives you that smooth finish you’re after.
Now, let’s talk about the stain itself. Choose a high-quality wood stain that suits your style. Dark walnut or espresso can add that luxurious touch, while a deep mahogany brings warmth. When applying the stain, use a brush or a rag, and remember: less is more! Apply it in thin layers, allowing each coat to dry before adding another. This way, you can control the darkness and avoid that dreaded blotchy look.
And here’s a little secret: don’t forget to seal the deal! A good topcoat will protect your newly stained cabinets from scratches and spills, keeping them looking fresh for years to come. Think of it as a protective shield for your kitchen’s crown jewels.
Revamp Your Space: How to Choose the Perfect Dark Stain for Your Cabinets
First off, think about the mood you want to create. Dark stains can range from rich espresso to deep walnut, each bringing its own personality. Are you aiming for a cozy, rustic feel or a sleek, modern look? Picture your kitchen or bathroom as a canvas; the right stain is your paintbrush.
Next, consider the wood type. Different woods absorb stains differently, which can affect the final color. For instance, oak tends to show off its grain beautifully, while maple might give you a smoother finish. It’s like choosing the right fabric for a dress; the base material can make all the difference in how the final product looks.
Lighting is another crucial factor. Natural light can change how a stain appears throughout the day. If your space is bathed in sunlight, a dark stain might look lighter and more vibrant. Conversely, in dimmer areas, it could appear almost black. So, grab a sample and test it out in various lighting conditions—this is your chance to play artist!
Lastly, don’t forget about the existing decor. Your cabinets should harmonize with countertops, flooring, and walls. Think of it as creating a symphony; every element should complement each other. A dark stain can be a bold statement, but it should also feel like it belongs in the room.
So, are you ready to transform your cabinets into stunning focal points? With the right dark stain, your space can go from ordinary to extraordinary!
Before and After: Stunning Kitchen Cabinet Transformations with Dark Stains
Picture this: those old, worn-out cabinets, perhaps a light oak or a dull beige, are begging for a change. You decide to embrace the boldness of dark stains, and suddenly, your kitchen transforms into a cozy, inviting haven. The rich, deep hues of espresso or walnut not only add depth but also create a stunning contrast against lighter countertops and backsplashes. It’s like dressing your cabinets in a chic, tailored suit that makes them stand out in the best way possible.
And let’s not forget about the impact on the overall ambiance! Dark-stained cabinets can evoke a sense of warmth and sophistication, making your kitchen the perfect spot for family gatherings or entertaining friends. It’s as if you’ve turned your kitchen into a trendy café, where everyone wants to hang out. Plus, the beauty of dark stains is that they can hide minor imperfections, making your cabinets look brand new without the hefty price tag of a complete remodel.
Frequently Asked Questions
What Tools Do I Need to Stain Kitchen Cabinets?
To stain kitchen cabinets, you will need a few essential tools: sandpaper or a sanding block for surface preparation, a clean cloth for dust removal, a brush or foam applicator for even stain application, and a stain of your choice. Additionally, gloves and a drop cloth are recommended to protect your hands and work area.
How Do I Prepare My Cabinets for Staining?
To prepare your cabinets for staining, start by removing all hardware and cleaning the surfaces thoroughly to eliminate grease and dirt. Sand the cabinets to create a smooth surface and help the stain adhere better, using progressively finer sandpaper. After sanding, wipe down the surfaces with a damp cloth to remove dust. Finally, apply a wood conditioner if necessary, to ensure even stain absorption.
Can I Stain Over Existing Finish on My Cabinets?
Staining over an existing finish on cabinets is possible, but it requires careful preparation. First, clean the surface thoroughly to remove grease and dirt. Then, lightly sand the finish to create a rough texture for better adhesion. After sanding, apply a suitable stain, ensuring it is compatible with the existing finish. Test on a small area first to check the color and adhesion before proceeding with the entire surface.
What Types of Stains Work Best for Darkening Kitchen Cabinets?
To effectively darken kitchen cabinets, consider using oil-based stains, gel stains, or water-based stains specifically designed for wood. Oil-based stains penetrate deeply, providing a rich color, while gel stains offer better control and minimize blotching on softer woods. Water-based stains dry quickly and are easier to clean up, making them a convenient option. Always test the stain on a small, inconspicuous area to ensure the desired effect before applying it to the entire surface.
How Long Does It Take for Stain to Dry on Cabinets?
The drying time for stain on cabinets typically ranges from 1 to 6 hours, depending on factors such as the type of stain used, humidity, temperature, and airflow in the environment. For optimal results, allow the stain to dry completely before applying a topcoat, which may require additional drying time.
